
When you're ready for new curtains, there are really only two measurements you need to nail: the width of your curtain track or rod and the final length (or 'drop') of the fabric. The trick is to always measure the hardware you'll be hanging them on, not the window frame itself. This is the secret to getting that full, professionally styled finish.
Getting Your Curtain Measurements Right the First Time
The difference between curtains that look amazing and those that just feel a bit... off? It often comes down to just a few centimetres. Before you even grab a tape measure, let's talk about the 'why'. This isn't just about covering glass; it's about framing your window to elevate the whole room.
So many people make the classic mistake of measuring only the window recess. This almost always leads to curtains that look skimpy and, worse, can't be pulled completely clear of the glass, which blocks out that lovely natural light you want to let in.
The Two Core Measurements
To get it right from the get-go, you just need to focus on these two critical dimensions:
- Curtain Width: Measure your curtain rod or track from end to end—not the window. For that lush, full effect, you want your hardware to extend well past the window frame.
- Curtain Length (Drop): This is all about where you want the hem to finish. You’ll measure from the very top of the track (or from the bottom of the rings on a curtain rod) down to your chosen endpoint. This could be just hitting the windowsill, dropping below it, or elegantly pooling on the floor.
A key idea to get your head around is 'stack-back'. This is the space the curtains take up at the side of the window when they're fully open. A 2017 New Zealand home improvement guide actually recommends adding at least 20 cm to each side of your window frame for the track. This gives your curtains enough room to 'stack' neatly without covering any of the glass, maximising your view and light.
Pro Tip: Always, always use a metal tape measure. The fabric or soft plastic ones you might have in a sewing kit can stretch and sag over longer distances, which is a recipe for inaccurate measurements and curtains that just don't fit right.
Thinking about the final look before you start measuring makes a world of difference. To help you keep track, here's a quick rundown of what you need to measure.
Essential Curtain Measurements at a Glance
This table summarises the two key measurements you need for a perfect fit.
| Measurement | What You're Measuring | Why It's Important |
|---|---|---|
| Track/Rod Width | The full length of your installed curtain hardware, from one end to the other. | Determines the fullness and drape of your curtains. A wider track allows for proper 'stack-back', so curtains don't block the window when open. |
| Curtain Length (Drop) | The distance from the top of the track or bottom of the rod rings to your desired hemline. | Dictates the final style and look, whether it's a crisp finish at the sill, a modern drop below it, or a dramatic pool on the floor. |
Getting these two figures right is the foundation for a flawless result.
For example, our range of custom-made linen curtains truly shines when given plenty of width for a beautiful, elegant drape. When you plan for that extra width and the perfect drop from the beginning, you're guaranteeing a much more refined and polished look in the end.
Get Your Gear Ready and Prep the Window
Before you even think about measuring, let's get organised. A little bit of prep work now saves a world of frustration later. Trust me, spending five minutes gathering the right tools will make the whole process a lot smoother and your results far more accurate.
The absolute hero of this job is a metal tape measure. I can't stress this enough. That soft fabric tape you use for sewing? It can stretch and sag, throwing your measurements off. A rigid metal tape is the only way to get the crisp, precise numbers you need. Grab a pencil and a notepad too – you'll want to write everything down immediately. Never, ever trust it to memory.
Your Simple Toolkit
You don't need a massive toolbox for this. Just a few key items will do the trick:
- Metal Tape Measure: Your non-negotiable tool for accuracy.
- Pencil and Notepad: To keep a clear record of every single measurement.
- Sturdy Step Ladder: If you have tall windows, this is a must for reaching the top safely.
- Spirit Level: Absolutely essential if you plan on installing a new curtain rod. You want it perfectly straight, not on a slant.
Once you’ve got your tools, take a moment to clear the decks. Move any couches, pot plants, or ornaments away from the window. This gives you a clear, unobstructed space to work in, ensuring your tape measure can run in a perfectly straight line from point to point.
The core idea of measuring carefully isn't just for curtains. It applies to almost any window treatment. For instance, you can find some great pro tips for measuring sliding window screens that follow the same fundamental principles of precision.
How to Correctly Measure Your Curtain Width
Getting the curtain width right is one of those details that separates a professional-looking room from an amateur one. It's not just about covering the glass; it's about creating a sense of luxurious fullness that frames your window beautifully.
The single most common mistake I see is people measuring the window frame itself. Don't do it! For stunning results, you need to measure the full width of your curtain track or pole. This ensures your curtains look generous and can be pulled completely clear of the window, letting all that lovely light flood in.
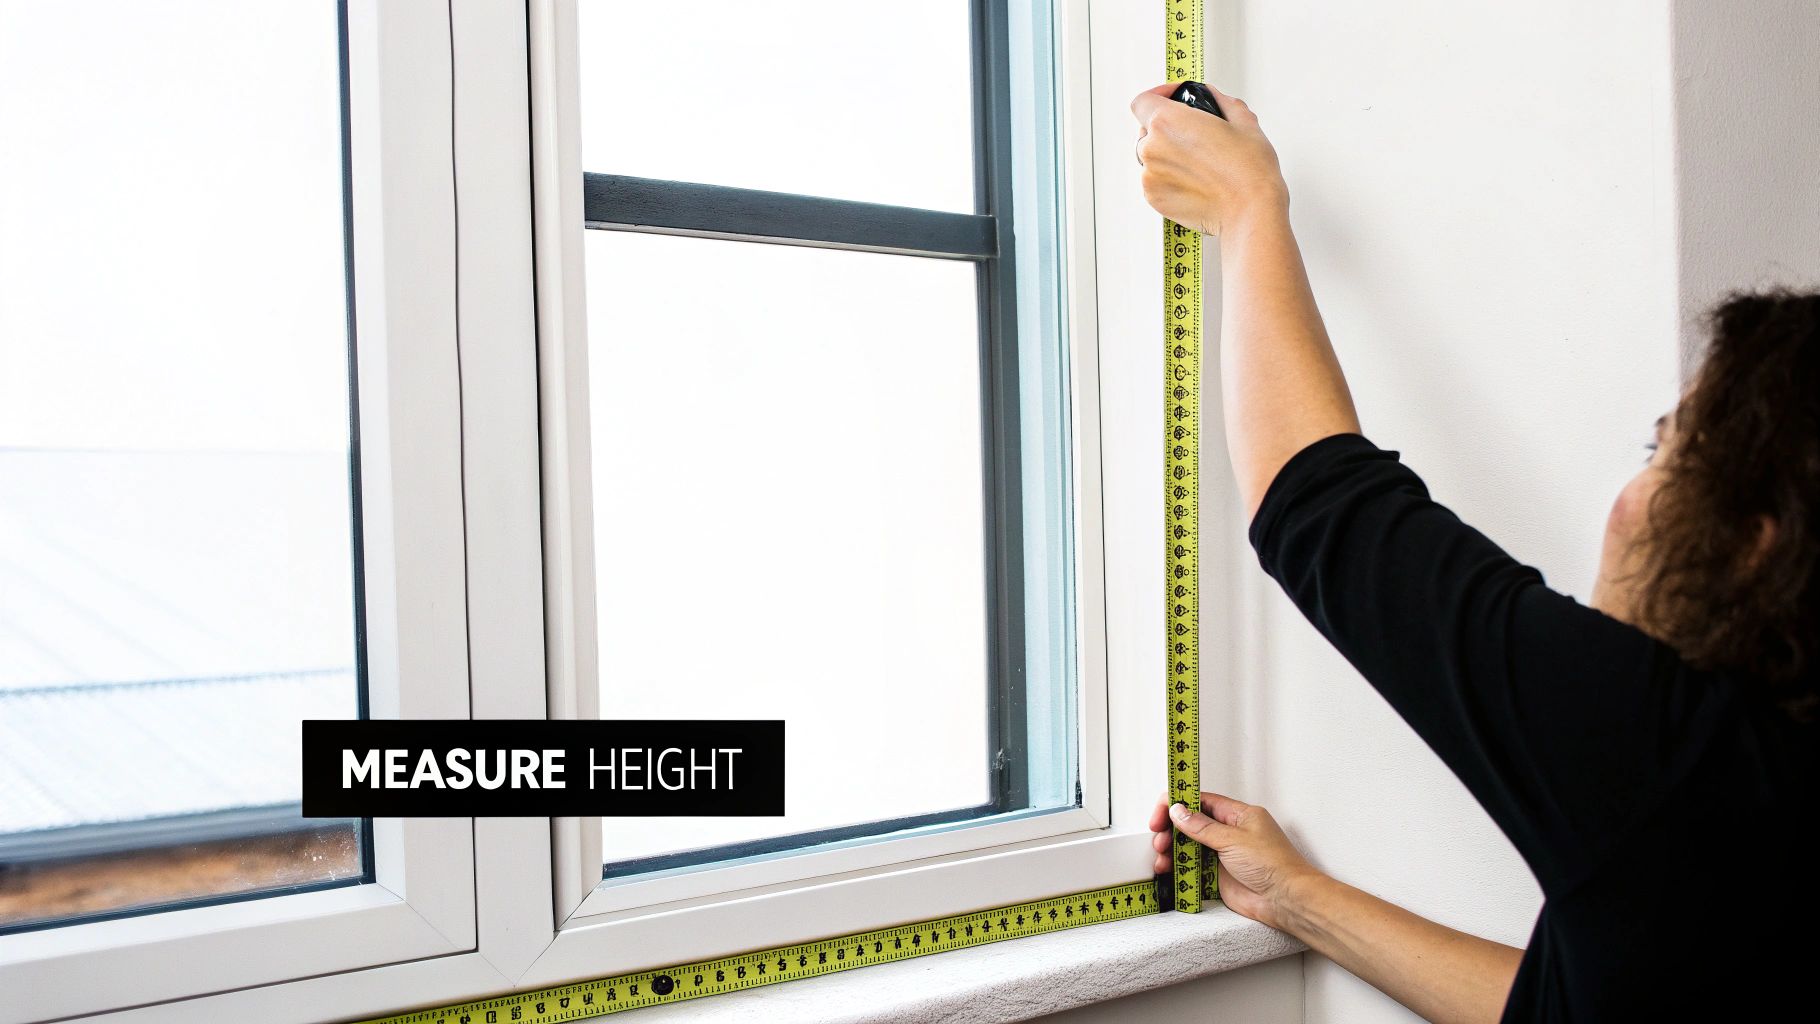
This image shows you the basics of measuring the window, which is your starting point.
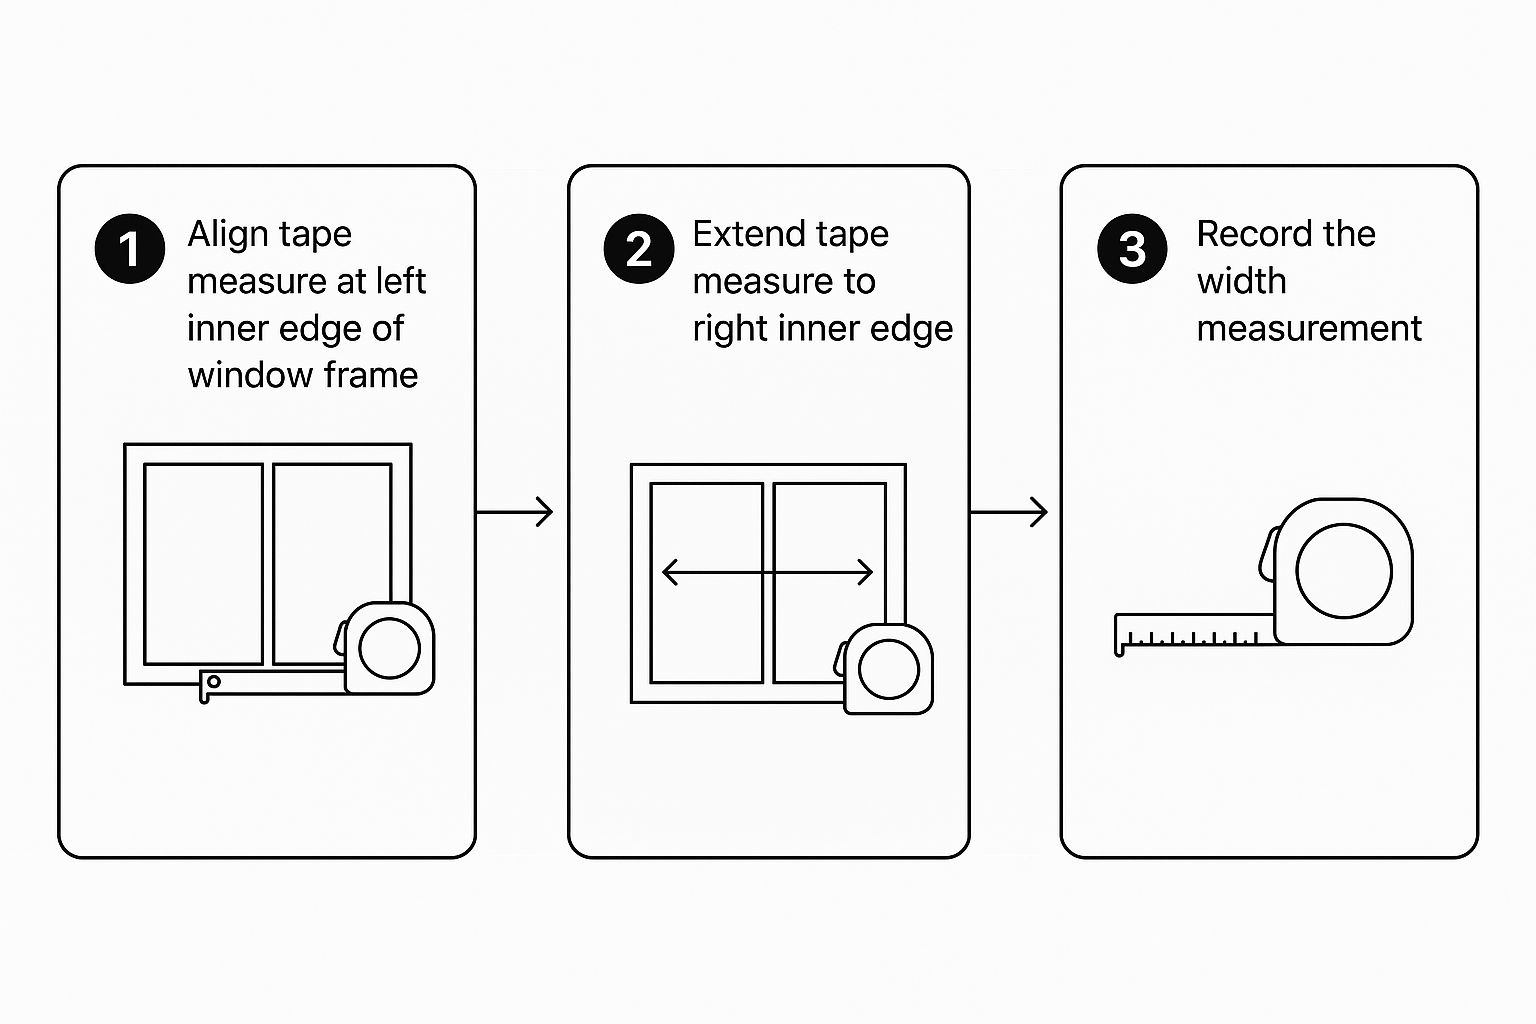
This measurement gives you the core dimension, but the real magic comes from what you add next.
Why You Need to Think About "Stack-Back"
Here’s a term you need to know: "stack-back". It's simply the space your curtains take up on either side of the window when they're fully open. If you don't account for this, your curtains will permanently block some of your glass, making the whole window feel smaller and darker. Not the look we're going for.
To get that polished, designer finish, your curtain pole or track should extend well past the window frame on both sides.
As a rule of thumb, I always recommend adding 15-20cm to each side of the window frame. So, for a 150cm wide window, you’d be looking for a track or pole that’s between 180cm and 190cm long. This frames the view perfectly instead of cutting it off.
In New Zealand, getting the stack-back right is a non-negotiable part of good design. In fact, many local experts suggest adding about 20cm on each side. This gives your curtains plenty of room to "stack" neatly beside the window when open, maximising your view and light. For a deeper dive, check out these excellent curtain measurement tips from maakhome.co.nz.
Factoring in Fullness and Heading Style
Okay, so you've got your final track or pole width. Now, how much fabric do you actually need? This all comes down to the heading style you've chosen, as different pleats require more fabric to create that lush, gathered appearance.
- Pencil Pleat or Pinch Pleat: These classic, tightly gathered styles need a lot of fabric. You'll want to multiply your track width by 2 to 2.5 times.
- Eyelet or Wave Curtains: These create a more contemporary, softer fold. A multiplier of 1.5 to 2 times the track width usually does the trick.
Let's put that into practice. For a 190cm track with a pencil pleat, you'd want at least 380cm of fabric width. It might sound like a lot, but this generosity is what creates the elegant, flowing drapes you see in interior design magazines.
Mastering the Curtain Drop for Perfect Length
Once you've got the width sorted, it's time to tackle the 'drop'. This is simply the final length of your curtains, but it's the measurement that truly defines the style and mood of your window dressing. Get this right, and you can turn a basic window into a real design feature.
Your starting point is crucial and depends entirely on the hardware you've installed. For a curtain track, you’ll measure from the very top of the track. If you're using a curtain pole, start your measurement from the bottom of the pole rings—this is where the curtain hook will actually connect. Getting this spot-on prevents that frustrating moment when you realise your new curtains are just a bit too short or long.
Choosing Your Curtain Finish Point
Where your curtains stop is a personal choice, balancing aesthetics with practicality. Each length creates a completely different feel, so it's worth thinking about how the room is used and the look you're going for.
Here are the three classic styles we see most often:
- Sill Length: The hem just touches the top of the windowsill. It's a clean and tidy option, perfect for kitchens or bathrooms where long drapes could get splashed or be impractical.
- Below Sill: This is a more modern and deliberate look, with the hem finishing about 15cm below the sill. It's a great way to avoid the accidental "too short" look while keeping the curtain clear of furniture or heaters.
- Floor Length: For that timeless, elegant finish, aim for the hem to sit 1-2cm above the floor. This stops the fabric from dragging and picking up dust but still looks properly grounded. It's by far the most popular choice for living rooms and bedrooms.
A Note on the 'Puddle' Effect: If you want to create a truly luxurious and dramatic statement, you could try a 'puddle'. This just means adding an extra 5-15cm to your floor-length measurement so the fabric pools beautifully on the ground. It's a style that works best with rich, heavy fabrics like velvet or high-quality linen that really show off their texture.
The Three-Point Measurement Trick
Many Kiwi homes, particularly older ones, have plenty of character—which often means floors or windowsills that aren't perfectly level. A floor can look flat to the naked eye but easily be a centimetre or two out from one side to the other.
To ensure your curtains hang perfectly straight, always measure the drop in three different places:
- Measure the left side.
- Measure the centre.
- Measure the right side.
If you want your curtains to hover just above the floor or sill, use the shortest of these three measurements as your final drop. This guarantees the hem won't snag or drag on any high spots. It’s a simple trick of the trade that makes all the difference in achieving that flawless, custom-fit look.
Common Mistakes and Pro Tips for NZ Homes
Getting the measurements right is one thing, but a few common slip-ups can still trip you up at the final hurdle. I've seen it happen many times! Knowing what to watch out for is key, particularly with some of the unique window styles we see across New Zealand.
The biggest culprit is forgetting about fabric fullness. You can have a perfectly measured track width and drop, but if the curtain fabric itself is too narrow, it will just hang there like a flat, lifeless sheet. To get that plush, professionally hung look, you need more fabric than the width of your track. As a rule of thumb, aim for at least 1.5 to 2 times the track width.
Another classic mistake is measuring the window frame itself, instead of the curtain track or rod. Your hardware is your true guide here. For the width, measure the track from end to end. For the drop, measure from the specific point on the hardware where the curtain hook will sit. This ensures your curtains are made for the hardware they'll actually live on.
Navigating NZ Specifics
Many Kiwi homes feature those lovely, wide ranch sliders or charming bay windows. They look fantastic, but they do need a slightly different approach to measuring.
- For Ranch Sliders: Think of them as extra-wide windows. The key is to extend your curtain track well beyond the frame—at least 20cm on both sides is a good start. This gives the curtains enough space to "stack back" neatly, clearing the entire doorway when they're open.
- For Bay Windows: These tricky corners usually require a special bendable track or a setup with multiple rods and corner connectors. You'll need to measure each flat section of the bay individually, then simply add those numbers together to get your total track width.
Here’s a pro tip I share with everyone, especially if you live in an older character home: always measure the drop in three different places—left, centre, and right. Floors and window sills are rarely perfectly level. Take the shortest of the three measurements to ensure your curtains hang beautifully without dragging on the floor in one spot.
Finally, don't forget how much your fabric choice matters. Heavier fabrics like velvet or a beautiful, weighty linen will drape very differently from light, sheer cottons. The right material completely transforms the final result, much like how a stunning olive linen duvet cover can set the entire mood for a bedroom.
Answering Your Curtain Questions
Even after you've got the basics down, a few tricky questions always seem to pop up. Let's tackle some of the most common queries I hear from homeowners, so you can get those measurements sorted with complete confidence.
How Much Wider Should the Curtain Rod Be?
A good rule of thumb is to have your curtain rod or track extend 15-20cm past the window frame on each side.
Why? It’s all about creating what we call "stack-back." This extra space gives your curtains somewhere to go when they're fully open, ensuring they don't block any of that precious natural light. It's a simple trick that also has the brilliant effect of making your windows look much bigger than they actually are.
Should Curtains Touch the Floor or Hover?
This really comes down to the look you're after and a bit of practicality. There's no single right answer, just what's right for your home.
- The Hover: For a clean, tailored finish, have your curtains hang about 1-2cm above the floor. This is a very popular, contemporary style that stops the hems from collecting dust and allows them to hang beautifully straight.
- The Puddle: If you love a bit of drama and a more romantic, luxurious feel, add an extra 5-15cm to the length. This creates an elegant "puddle" of fabric on the floor.
Is Measuring Different for Eyelet Curtains?
Yes, it is! While you'll measure the width in exactly the same way, the drop (or length) needs a slightly different approach for eyelet curtains.
You need to measure from the very top of the curtain pole down to where you want the curtain to finish. This is crucial because a portion of the fabric sits above the pole, and if you don't account for it, your curtains will end up too short.
This attention to detail is what transforms a room. Just as the perfect curtain length sets the tone, the right textiles elsewhere, like our soft French linen pillowcases, are key to creating a truly comfortable and stylish sanctuary.
What if My Floor or Windowsill Isn't Level?
Don't worry, this is incredibly common, especially in older Kiwi homes! Uneven floors and sills are part of their character.
The solution is simple: measure the drop in three different places – once on the left, once in the centre, and once on the right. Then, to make sure your curtains never drag awkwardly in one spot, use the shortest of these three measurements for your final length. This guarantees a clean, consistent look.